

Getting the Most Out of Your Downward Facing Dog
Jul 18, 2022Most of my students come from a Bikram Yoga background. They sweated it out for years and then decided that there must be more to this yoga thing… and they’re right.
And, one of the more common postures you’ll find everywhere else in the yoga world and in yoga classes is Downward Facing Dog (Adho Mukha Svanasana), or Down Dog for short.
This posture looks so simple, right?
You just bend over put your hands on the floor, look in between your legs and wait for the instructor to (finally) move on to other things. But, there’s way more to it than that.
Down Dog is often referred to as a resting posture, but in the beginnings of bringing this kind of work into your practice it feels like anything but a ‘rest.’ It’s more of a sweat-dripping-in-my-eyes-and-arms-are-aching-and-fatigued-kind-of-posture.
But, over time, as you improve, it does calm everything down, helping you to reconnect with your breath if you lost it and bringing blood flow to your brain.
It is also opening up your backline to improve your forward folds and hip mobility, strengthening up your core and your arms, preparing you to begin your arm balancing and inversion work.
Down Dog is a must-have posture if you want to move into new places and spaces in your practice.
So, this week I thought I’d offer you my top tips to improve your Downward Dog to help you get the most out of it when it shows up in the classes you attend:
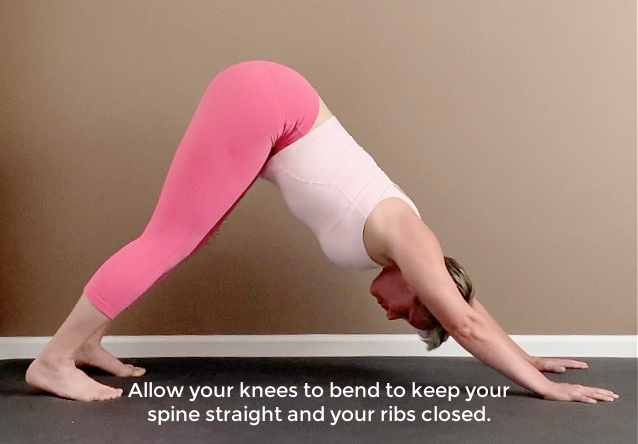
1. Close your ribs. Closing your ribs can be a tricky thing to find, so be patient with yourself.
When you learn to close your ribs, you will achieve a neutral spine. This means you won’t be relying on a backbend to keep you in the posture or round your lower spine (this often results in injury over time and is one of the more common “yoga injuries” out there).

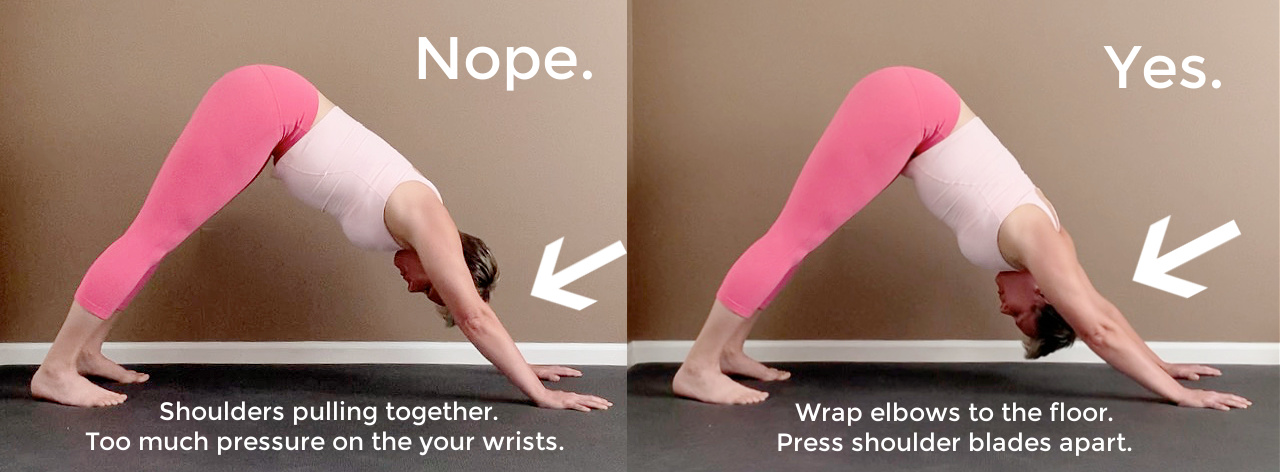
2. Wrap your elbows/triceps to the floor. This will help you to engage through the shoulders, so that your biceps do not become exhausted.
The isometric contraction of your muscles through the arms and shoulders will help you build a ton of strength over time and lead you to new accomplishments on your mat.
Also, this wrap of the elbows/triceps trains your body for proper positioning in arm balances and handstands.
3. Use your fingers. If your wrists ache after a class that pulled you into Down Dog again and again, you are not using your hands on the mat properly. (Check out my blog post on this subject here. It’s a game changer for your practice!)
4. It’s not about straight legs. If you need to bend our legs, bend them. How do you know you need to do this? You can’t keep your spine neutral – you’re back bending or rounding the long spine.
To figure out if you need a slight bend in the knee, take a side view picture or have a yoga professional take a look at it to help you make the proper adjustments.
Diving into the technicalities of any posture is always fascinating, so don’t blow off doing this with your foundational postures, such as Downward Facing Dog. They are setting you up for everything that is on its way to you.
I hope this helped you get clearer on how to get the most out of your Down Dog work and that you were able to absorb some new information on the subject.
Here’s to growing your practice beyond what you once believed was possible and surprising yourself on the daily.
Sending you love & hugs,
Tori ♡
Want to develop a lifelong yoga practice that evolves, grows, and surprises you on the daily? Come join me for class.
Join me for my weekly
Mat Chats Newsletter
Besides a healthy dose of yoga inspiration and fun, you'll receive first look at live in-person events, trainings, & retreats and all of the latest updates.
I hate SPAM. I will never send you junk.
Author


